eForms™ Administration Portal
The eForms™ Administration Portal is a web portal where Administrators manage all aspects of eForms™ Cloud.
Important
The module must be licensed and admin users must be configured with eForms Admin permissions to log in. See Assign eForms™ User Permissions for more information.
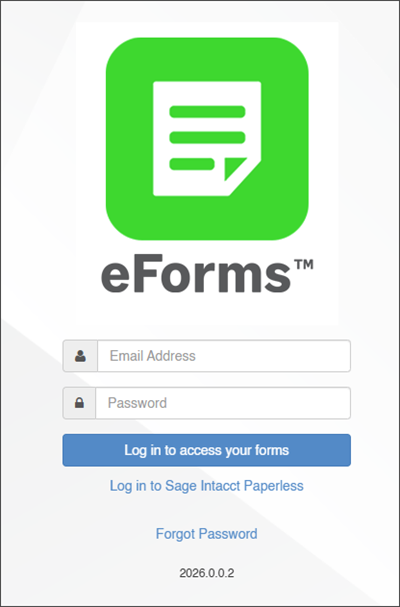
Enter your email address and password.
Note
Use the email address that was used when your admin permissions were assigned in Sage Intacct Paperless. Reset your password if needed.
Click .
A page similar to the following displays:
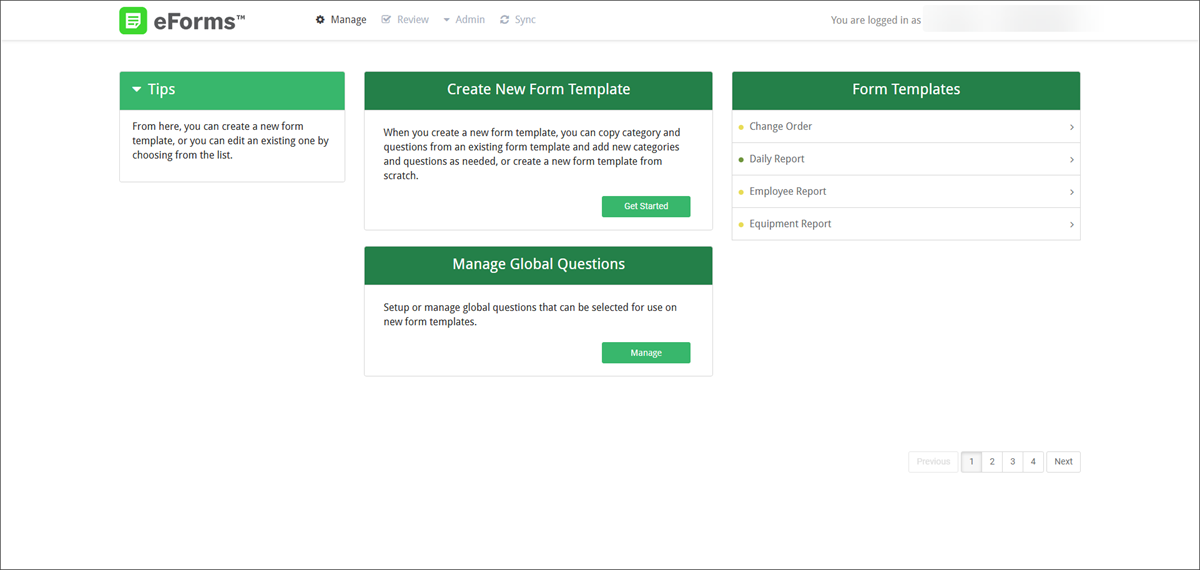
From here, you can use the options in the top menu to navigate to the following areas:
Manage page: Create or customize eForms templates and manage global questions.
Review page: Review forms submitted by users.
Admin dropdown: Select one of the options to create announcements, configure the appearance of the application or view a list of registered devices. You can also set up daily field reports.
Sync page: Review a list of forms that failed to sync to Sage Intacct Paperless.
Use the options on the Manage page of the eForms Administration Portal to create or customize eForms templates and manage global questions.
You can create a new eForms™ template by adding categories and creating the questions users are going to answer when they complete the form.
Each template category contains one or more questions for the user to answer (for example Job Number, Report Date, Employee Number, GPS Location). Each template question must either be answered or marked Not Applicable before the form can be submitted back to Sage Intacct Paperless.
In the Create a New Form Template pane, click .
The Create Form Template dialog displays.
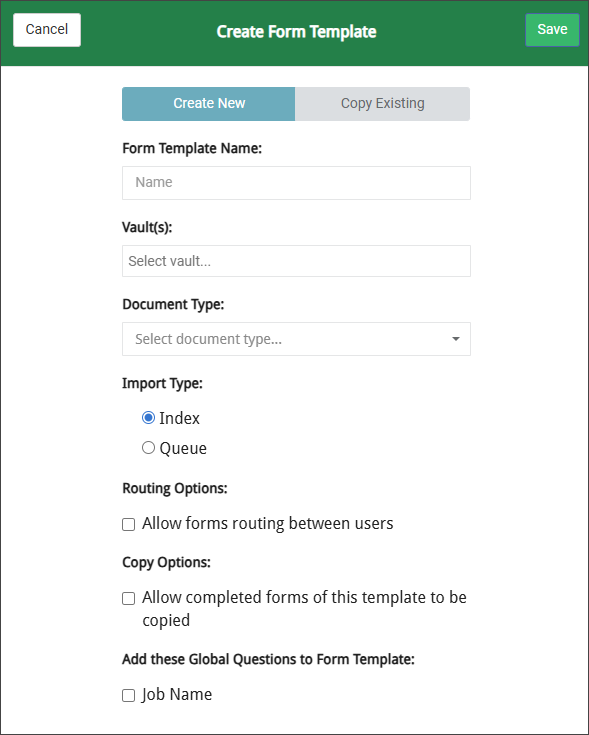
(Optional) From the Create Form Template dialog, you can choose to create a new template or to copy the categories and questions from an existing template. To copy an existing template, click and select the template you want to copy from the Copy Existing Form Template dropdown.
In the Name field, enter the name of the template.
Click into the Vault field and choose a vault from the list that displays. Repeat this step to add additional vaults in which this template may be used.
Note
The list that displays includes the vaults configured in Sage Intacct Paperless. When uploading a completed form, users can choose which vault(s) to submit it to if more than one option is added here.
In the Document Type dropdown, select the document type that is set up in Sage Intacct Paperless that corresponds to your new template.
Note
Submitted eForms are submitted as this document type in Sage Intacct Paperless.
In the Import Type section, choose one of the following:
Select if the template should be automatically indexed once it is uploaded to Sage Intacct Paperless.
Select if the template should be sent directly to a queue and indexed later.
Select the check box to enable the template to be routed between multiple people for input or approval.
Select the check box if you want to allow these forms to be duplicated in the future.
Note
If you select this check box, an additional check box displays. Click the box to Require each answer from a copied form to be accepted before resubmission to make sure that the user visits each question on the copied form before being able to submit. If checked, the copied form's answers are disabled until the user touches each one. Leaving the box unchecked allows the user to skip the question and submit the same answer from the previously completed form.
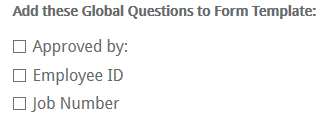
Select the check box next to the type of Global Questions you want to add.
Note
If no global fields were created, this option does not display (see Manage Global Questions for more information).
Click in the top right corner of the page to save the changes and open the Template Manager (see Form Template Manager for more information).
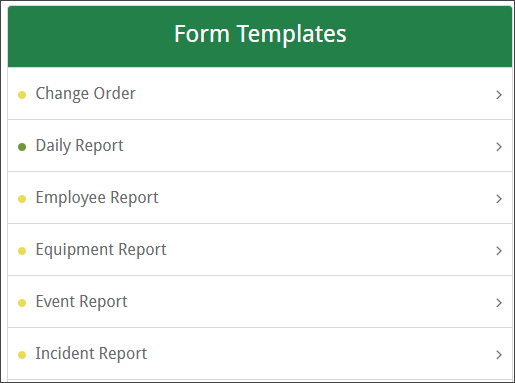
Once a template is created, it is added to the Form Templates list.
The green or yellow circle to the left of the template name indicates whether the template is active or inactive. Green indicates the template is published (active) for use and yellow (inactive) indicates the template is unpublished.
Note
If the list of templates spans multiple pages, click a page number in the bottom right corner of the list or click to navigate to the next page.
 |
Click on the name of the template you want to edit.
A page similar to the following displays:
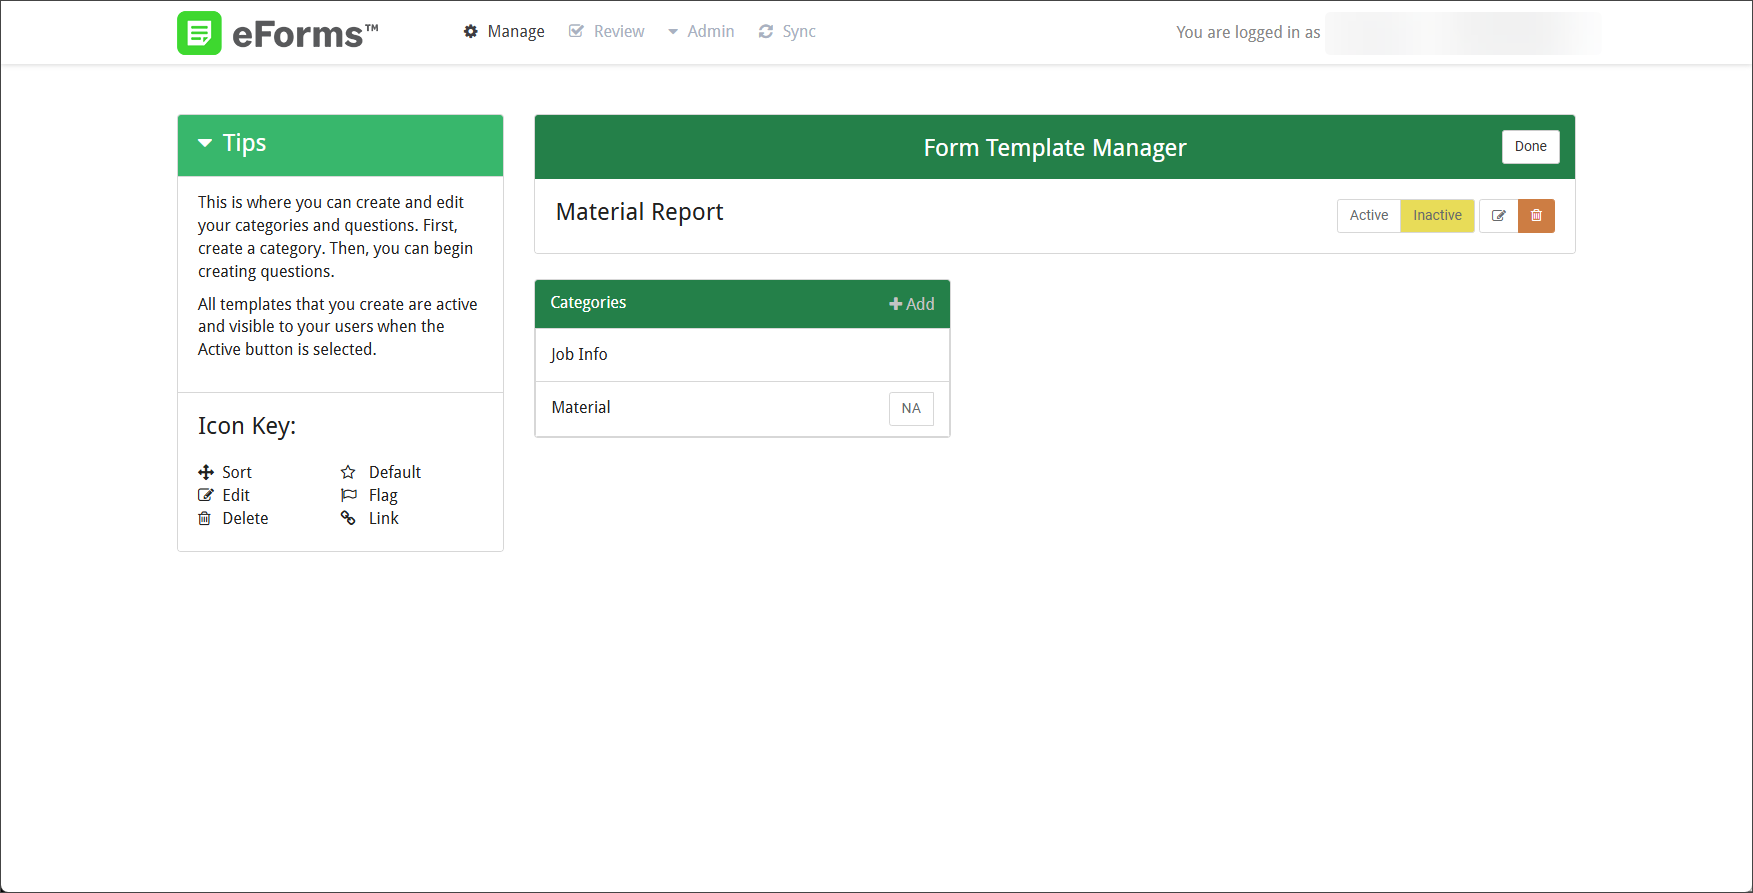
Click the Edit
 icon to open the Edit Template page.
Make changes as needed:
Click into the Vault field and choose a vault from the list that displays. Repeat this step to add additional vaults in which this template may be used.
Note
The list that displays includes the vaults configured in Sage Intacct Paperless. When uploading a completed form, users can choose which vault(s) to submit it to if more than one option is added here.
In the Document Type dropdown, select the document type that is set up in Sage Intacct Paperless that corresponds to your new template.
Note
Submitted eForms are submitted as this document type in Sage Intacct Paperless.
In the Import Type section, choose one of the following:
Select if the template should be automatically indexed once it is uploaded to Sage Intacct Paperless.
Select if the template should be sent directly to a queue and indexed later.
Select the check box to enable the template to be routed between multiple people for input or approval.
Select the check box if you want to allow these forms to be duplicated in the future.
Note
If you select this check box, an additional check box displays. Click the box to Require each answer from a copied form to be accepted before resubmission to make sure that the user visits each question on the copied form before being able to submit. If checked, the copied form's answers are disabled until the user touches each one. Leaving the box unchecked allows the user to skip the question and submit the same answer from the previously completed form.
Select the check box next to the type of Global Questions you want to add.
Note
If no global fields were created, this option does not display (see Manage Global Questions for more information).
Click in the top right corner of the page to save the changes and open the Template Manager (see Form Template Manager for more information).
The Form Template Manager is where you can add or update the categories (and their questions) found in individual template forms.
You are automatically sent to this page after completing the steps in Create New eForms™ Template or Edit an eForms™ Template. You can also access it by clicking a template from the Form Templates list.
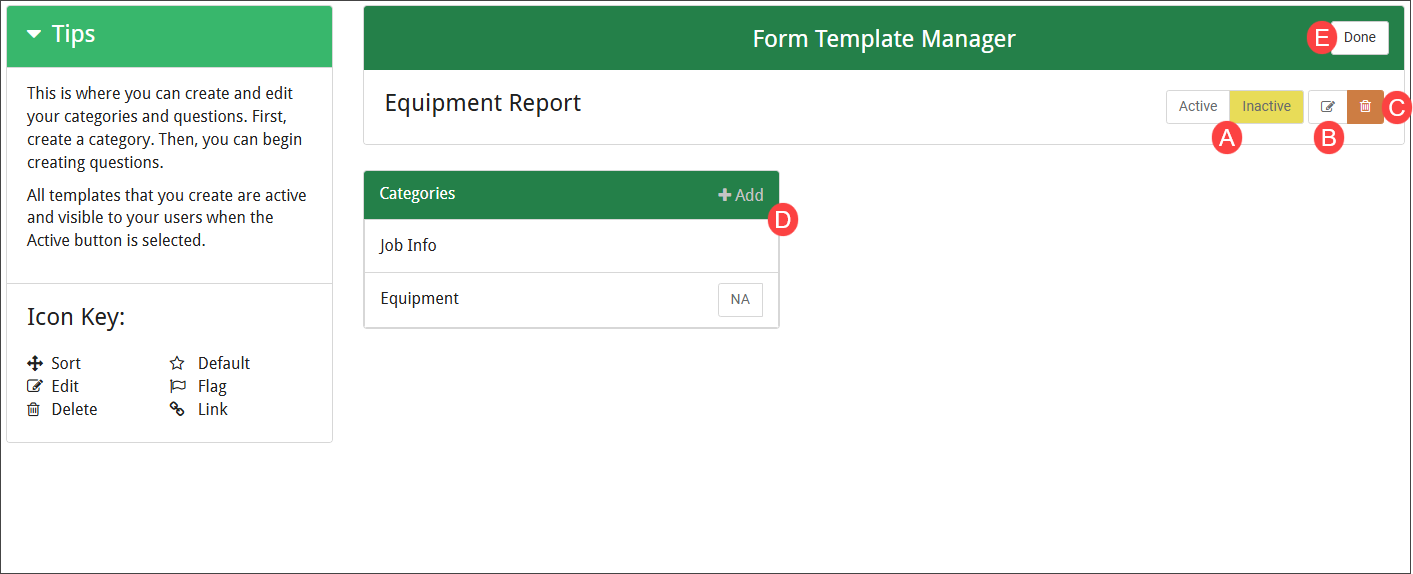
| A: Click to make the form available to field personnel or click to unpublish it. |
| B: Click the Edit icon to make changes to the characteristics of the template. |
| C: Click the Delete icon to delete the template, then click in the confirmation dialog. |
| D: Edit or add Categories to the template. See or for more information. |
| E: Click to exit the Form Template Manager. |
Categories allow questions to be organized by subject must be created before questions can be added to an eForms™ template.
Note
For example, you could create a Job Info category to include questions that prompt the user to answer job number, location and date questions for every associated eForms they complete.
You can also edit or delete a category and rearrange multiple categories in a list from the Form Template Manager page.
Create New Category
From the Form Template Manager, click .
The Add Category dialog opens with the Create New tab active.
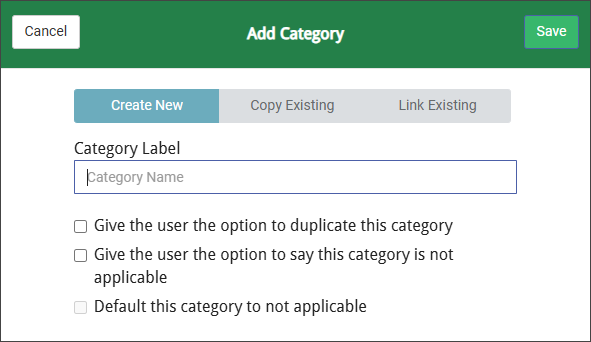
Type the name of the category in the Category Label field.
(Optional) Select if the user filling out the form should be able to duplicate the category (and its questions) to fill them out multiple times.
Note
For example, a supervisor might be required to enter information for each employee on the job. An Employee Info category requires input for the employee name, regular hours worked and overtime. Allowing this category to be duplicated gives the supervisor the ability to complete an Employee Info section on the form for each employee on the job.
(Optional) Select if the user filling out the form should be able to mark it as and skip it.
(Optional) Select if it should be set to NA and skipped unless the user filling out the form enables it.
Note
The Give the user the option to say this category is not applicable must be selected for this option to be selectable.
Click .
Copy Existing Category
Note
If you make updates or change a copied category, only that category is updated. If you want your updates to be carried through to all categories that are based on the same source, see Link Existing Category for more information.
From the Form Template Manager, click .
To create a category based on an existing category, click the tab.
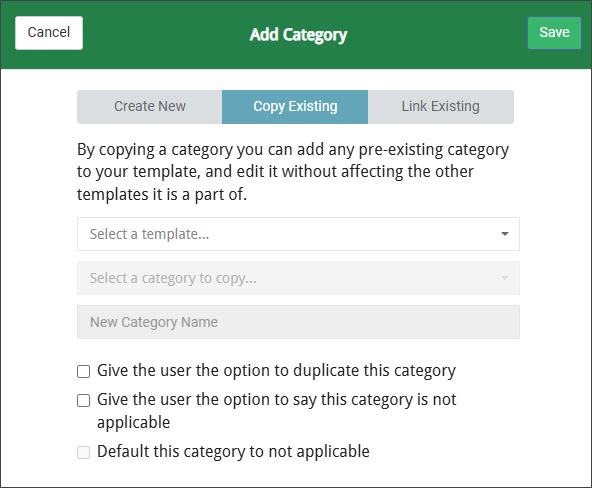
From the Select a template dropdown, select the template containing the category you want to copy.
From the Select a category to copy dropdown, choose the category to be copied.
Enter the new name for the category in the New Category Name field.
(Optional) Select if the user filling out the form should be able to duplicate the category (and its questions) to fill them out multiple times.
Note
For example, a supervisor might be required to enter information for each employee on the job. An Employee Info category requires input for the employee name, regular hours worked and overtime. Allowing this category to be duplicated gives the supervisor the ability to complete an Employee Info section on the form for each employee on the job.
(Optional) Select if the user filling out the form should be able to mark it as and skip it.
(Optional) Select if it should be set to NA and skipped unless the user filling out the form enables it.
Note
The Give the user the option to say this category is not applicable must be selected for this option to be selectable.
Click .
Link Existing Category
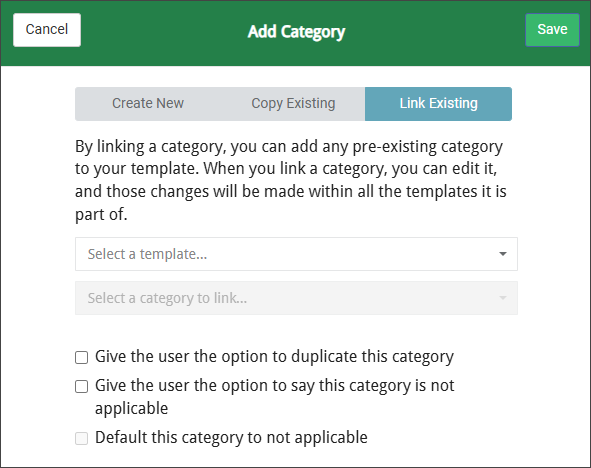
The Link Existing tab allows you to copy an existing category using the same process as Copy Existing Category. However, if any of the settings are changed on a linked category, those changes carry through to the original category and any other linked categories.
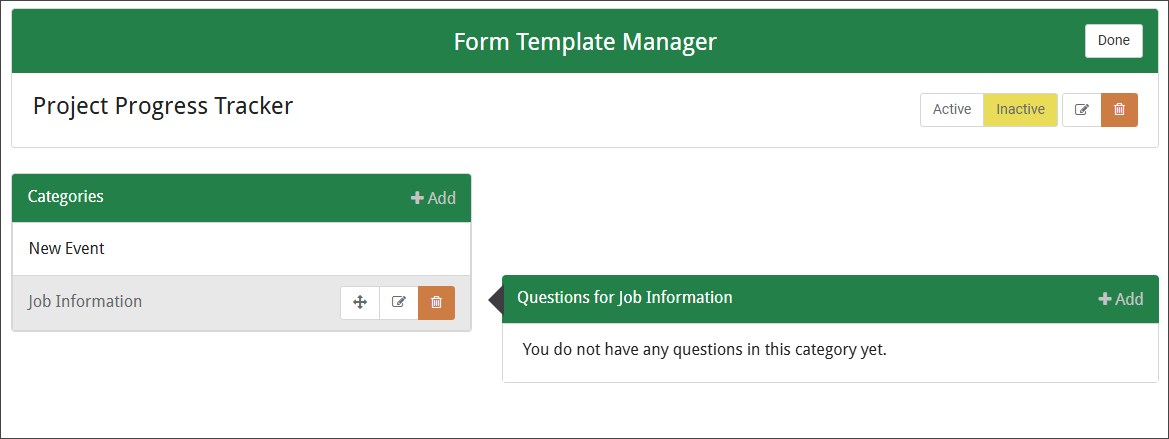
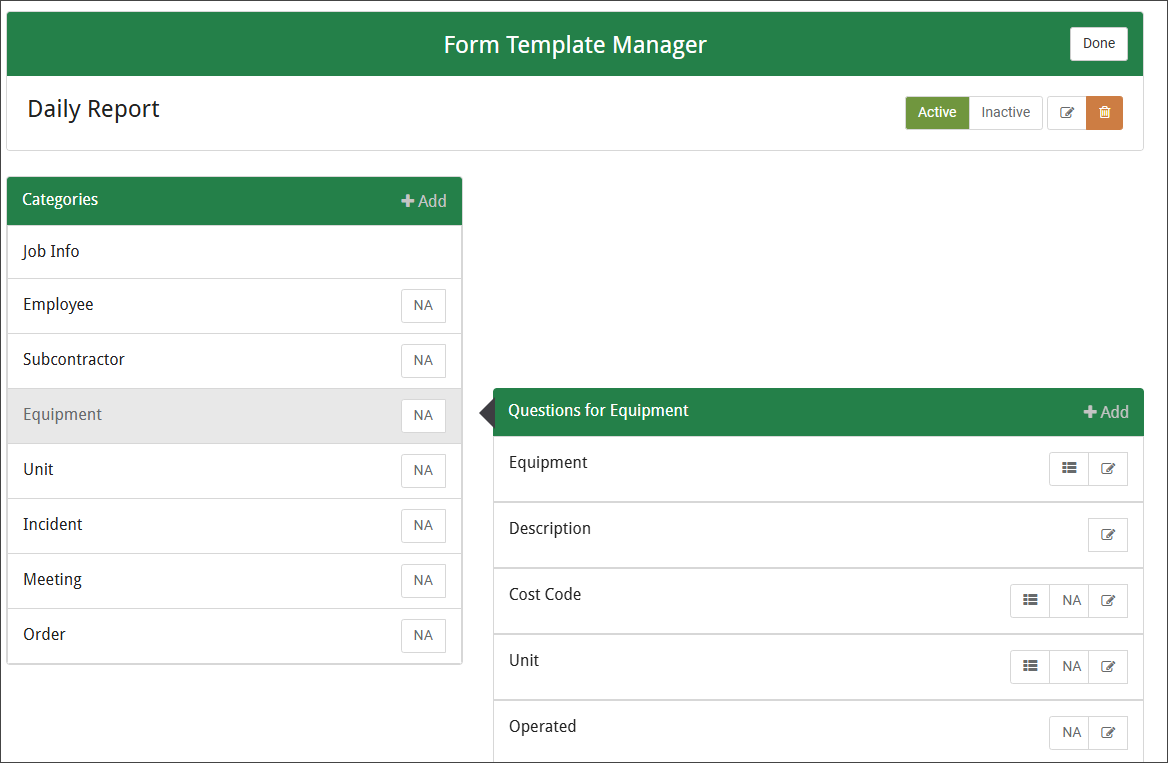
View a list of questions for an existing category by clicking on the category name. This opens theQuestions for (name of category) page. For example, clicking on the Job Info Category opens the Questions for Job Info page.
From the Form Template Manager,
You can add or edit questions in a category:
To create a new question within a category, open the Question Editor by clicking . Template questions are contained in Categories. See Categories for more information.
To edit an existing question, select it from the list to open the Question Editor then click the Edit
icon.Note
When you edit questions, some values like the question type or name may be read-only.
Proceed to Question Editor to configure your questions.
Question Editor
By default, the Question Editor opens with the Yes/No tab selected.

Click the tab that corresponds with the question type you want to create.
Note
When you edit questions, some values like the question type or name may be read-only.
In the Question pane, enter the applicable information:
Note
The options below vary by question type.
Question Text: Enter the question as you want it to display to the end user.
Question Hint: Enter additional information to help users answer the question.
Index Type: To save the answer to a document index, click the dropdown to select from a list of available index types. Each type is linked to a list of answers from which a user may select.
Note
For example, if the index type selected is Job Number, the available answers in the eForm are a list of job numbers.
Give the user the option to say this question is not applicable: Select this check box if you want to give users the ability to skip this question while completing the form.
Save answer to question as document note: Select this check box if the answer to this question should be saved as a document note in Sage Intacct Paperless.
Note
Answers entered here display in the Notes tab of the document image Viewer. This option is only available for Text Field questions.
Configure the Answer Type:
Yes/No
Allows users to answer with a "yes" or "no." Is something true or not?
Enter the values (if different) for the Yes Label and No Label fields. For example, you may want to use True/False instead.
In the Options section, you can click the Star
 icon to set one of the labels as the default answer.
Click one of the values in the Options section to display the Conditional Questions pane, then click if you want a certain user response to trigger a follow-up question.
Multiple Choice
Allows users to select from a list of answers.
Allow Multiple Answers: Allows user to select more than one answer.
Allow Other: To create a specific label and add it to the list on the form. This opens an additional field to type the name of the label.
Pull options from URL: The URL links to the set of lists that are published from the Sage Intacct Paperless system. Multiple choice options that contain a URL pull data on the fly from the server.
Text Field
Allows users to type a response in a text field. Open-ended questions use this option.
If you want to limit the number of characters in the user's response, enter the maximum number allowed in the Character Limit field. If you want to use a default answer that displays while the form is being completed, type that response in the Default Answer field. You can also link to a default answer by entering its URL.
Select the check box to expand the Default Answer field into a memo field.
Select the check box if you want to limit users' responses to number format.
Slider
Allows users to select from a range of values using a slider control based on your set increments.
Enter the fixed amount you want to slider to increase/decrease by in the Increments field. For example, if you enter
5, the slider stopping points increment by five between the Min and Max Values. The Default Value is where the slider rests before it is adjusted by the user.After entering the increment and value information, you can click the to see how it is going to display for the user.
Date/Time
Allows users to open a calendar and select a start/end date or a start/end time value.
From the dropdown, select either (MM/DD/YYYY), (MM/DD/YYYY HH:MM AM/PM) or (HH:MM AM/PM). Then, select one or more of the following check boxes:
Default: Set a default date or time for the answer. However, by default the date picker control automatically defaults to the current date or time for the user.
Minimum: Setting a minimum Date/Time prevents the user from entering a date/time less than what is indicated.
Maximum: Setting a maximum Date/Time prevents the user from entering a date/time greater than the date indicated.
Media
Allows users to upload image, video or audio files.
Choose the type of media that can be uploaded in response to this question, then indicate if only one file or multiple files are allowed.
Select the check box if they need to name the file before submitting their response.
Signature
Creates a signature block that enables users to sign the form.
If this question type is selected, a signature line is added to your Template in this category. The user can sign with a finger or stylus and it is stored and available for review along with the date and time the signed form was submitted.
GPS
Allows users to capture their GPS location.
Choose or for the Measurement Unit dropdown. This question type provides a button where users can capture their current location.
Note
Location services must be enabled on the user's device.
Acknowledge
Allows users to accept or decline a question and add a memo.
Type your Acknowledgement Memo text that you want users to agree to when completing this question.
Enter the values (if different) for the Accept Label and Decline Label fields. For example, you may want to use Agree/Disagree instead.
Certain questions and options allow you to flag a field to indicate its level of importance. Clicking the Flag
 icon opens the Set Flag dialog. Select a flag level and then click .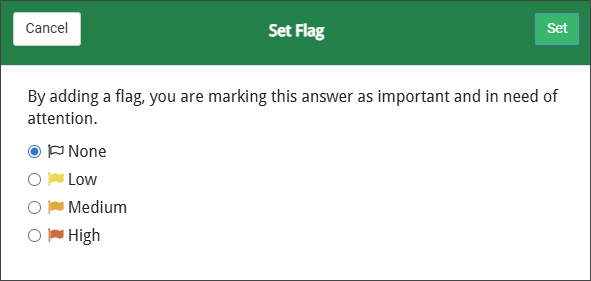
To create a conditional question that are triggered based on the user's response, click on the answer and then click . In the Add Conditional Question page, select the type of question to use and enter the question criteria.
(Optional) In the Additional Information pane, click to request more information related to this question from the user filling out the form.
When finished selecting the criteria for a question, click one of the following buttons:
Back to Template returns the user to the Form Template Manager page
Save saves changes and the Question Editor page remains open.
Save and Add Another saves changes and opens a new instance of the Question Editor page for another question to be created.
You can create and edit questions that are globally available to be included in multiple eForms™ templates.
For example, to display the job number at the top of a completed eForms, create a Job Number global field. Once created, this field can be optionally added to any newly created template.
Click .
The Manage Global Fields page displays:
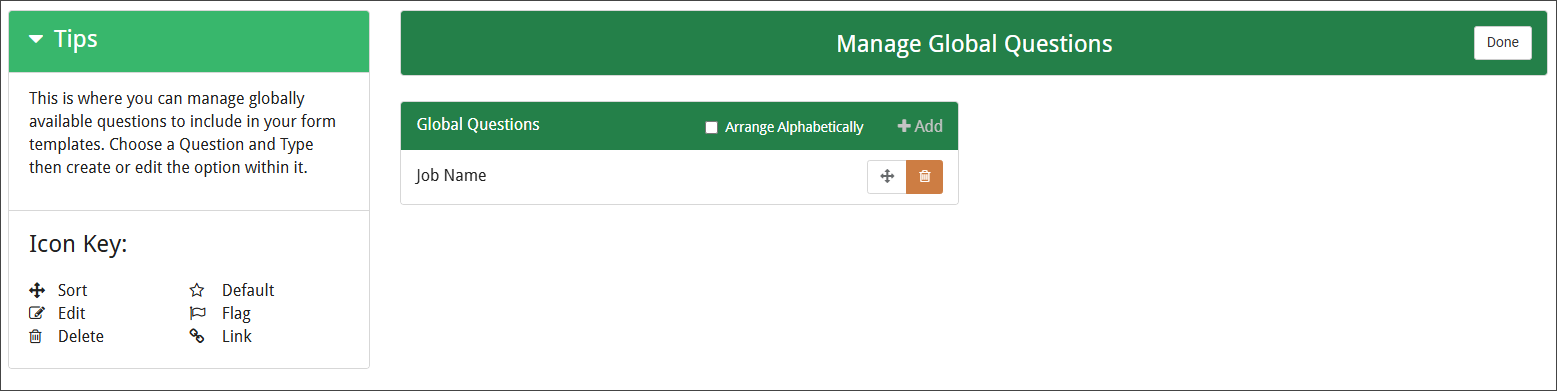
To create a new global question, click .
The Create Question dialog displays.:
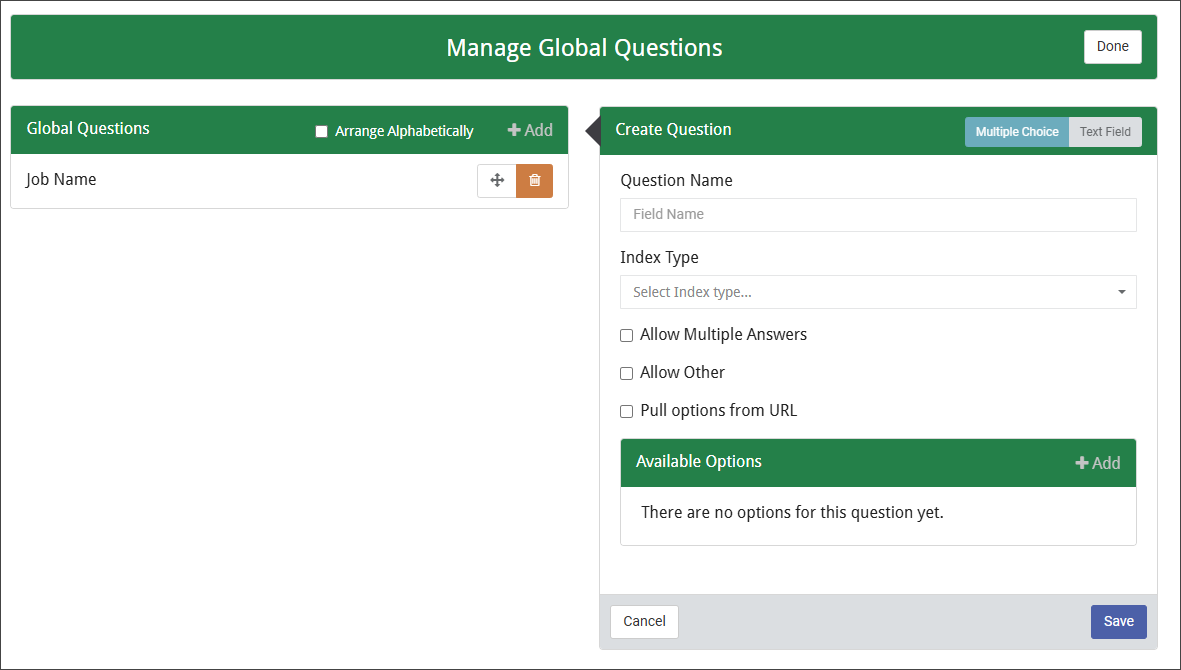
(Optional) To edit an existing global question, click the name of the question in the list to open the Edit Question dialog.
Choose or , depending on the type of question you want to create. See Add or Edit eForms Questions for more information on configuring different types of questions.
Click the tab to review completed eForms.
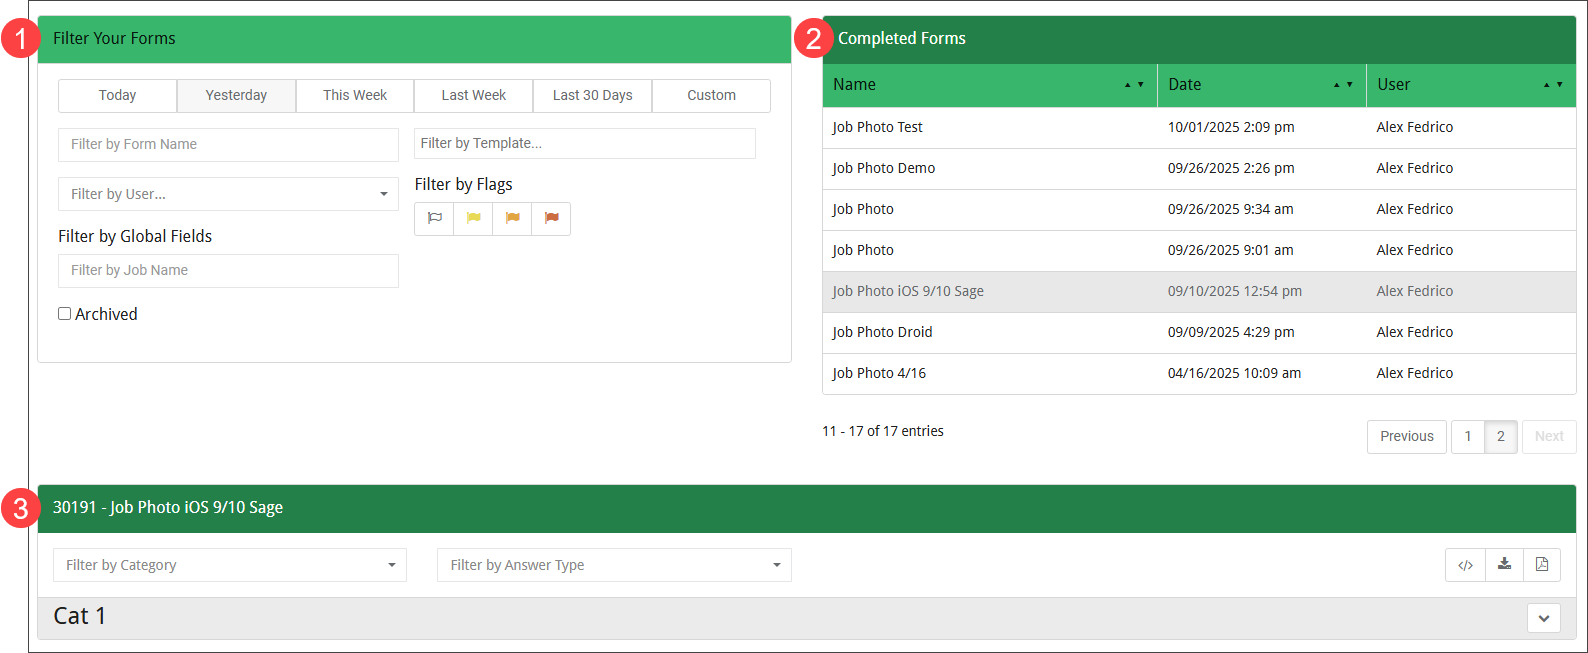
The Review Page has the following three sections that can be used by eForms™ Admins:
Filter Your Forms:
Click , , , or to select the report with a submission date equal to the option. Choosing Custom allows additional details for filtering.
Filter by Form Name: Type in the title or name of the form to filter by. While typing, the Completed Forms section filters out the forms to match the letters being typed.
Filter by User: Pick the to view their reports.
Filter by Global Fields: With Global Fields set up, each global field is listed. Type in the answer value to see how the Completed Forms are filtered.
Filter by Template: Choose the template type to filter the list by.
Filter by Flags: Select the flag color to filter the forms by. Any form with that flag color associated with an answer remains in the list.
Archived: Select the check box to display forms no longer in use.
Completed Forms: Lists all of the submitted forms, filtered by the criteria you entered in the Filter Your Forms section.
Form Details: Displays the categories, answers and flags for the form currently selected in the Completed Forms section.
Filter by Category: By default, all categories of the form are displayed. Pick a particular category from the dropdown list to filter out all of the other categories.
Filter by Answer Type: Choose an answer type from the dropdown list to only display answers of the selected type.
Download Full JSON: Click to download the form data in full JSON format.
Download Flattened JSON: Click to download the form data in full JSON format.
Generate Report: Click to produce the PDF Report that gets downloaded to Sage Intacct Paperless.
From the Admin dropdown menu, you can configure the following options:
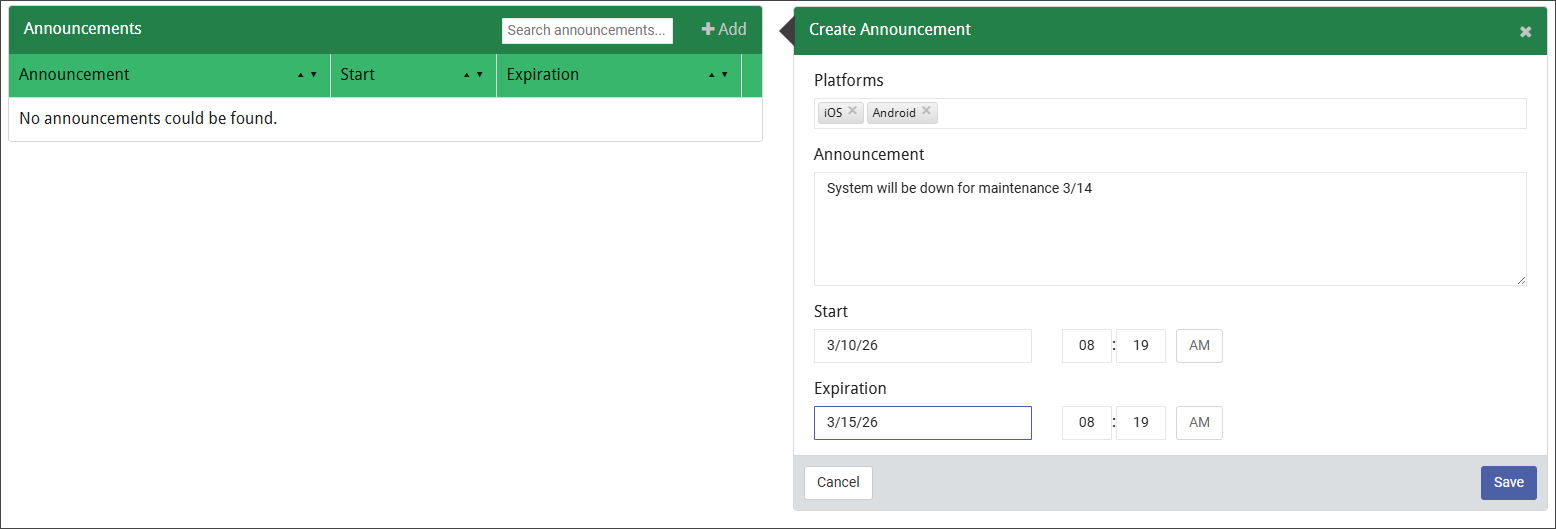
The Announcements page allows messages to be created that are then broadcast to connected devices.
For example, if the system has planned maintenance on a specific date, announcement can be created to notify personnel in the field.
To access the Announcements page, select . Click to create a new announcement.
The Configuration page provides options for customizing the colors and logo on the created forms.
Upload a company logo to display on the login page and in the upper left corner of all other pages for a connected device.
Note
By default, the eForms™ logo displays.
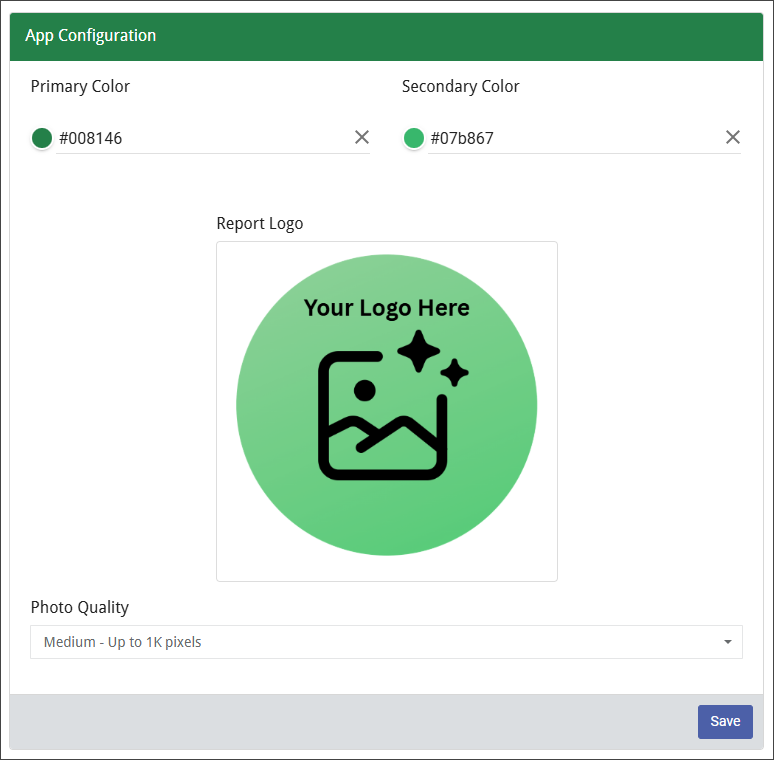 |
Click in the or field to change a color. A preferred color's hex code can be typed directly into the field.
Primary Color: Controls title fields, text fields, progress bars and the Yes button of a Yes/No question.
Secondary Color: Controls the No button of a Yes/No question.
To customize the Report Logo, hover the mouse arrow over the logo to be changed and click the Upload
 icon that displays in the top right corner. The report logo displays on the document when a form is completed and printed out.
The Photo Quality dropdown allows the resolution for images to be selected. Click the dropdown menu to choose a setting.
Note
Selecting fewer pixels reduces the amount of disk space a stored image uses.
Click .
The Devices page displays a list of devices that have connected to the eForms™ application. Each individual device has a unique device key that is native to the device.
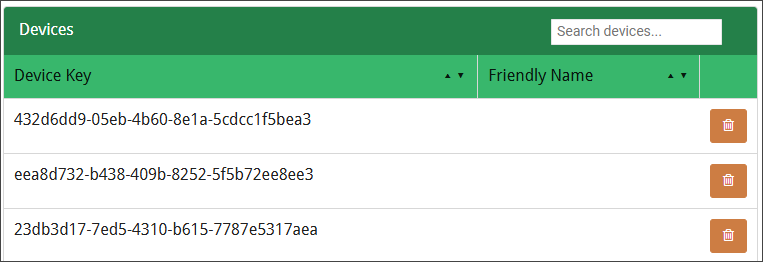
To remove devices from the system, click the Delete  icon and respond to the prompt.
Users can assign a "friendly name" to their device from within the eForms application under .
Export Forms: You can create forms to share with other companies or satellite offices. This way you only have to create a form once before sharing it. Click to select the form and then click the button.
Import Forms: Click the Import JSON button to bring up the window. Locate the JSON file and click . When you import the form into eForms™, it has an Inactive status.
Important
You must set the Document Type, select the Vault and add the Indexes on the questions.
To configure and manage Daily Field Reports for Sage Intacct Paperless, see Add Field Reports for more information.
A construction Daily Field Report is a standardized document used by project managers, foremen, or superintendents to record daily activities, conditions, labor, materials, equipment usage, safety incidents, visitors, and other relevant project information on a construction site.
It serves as a daily log that provides a factual record of site progress and events.
Using eForms™ to complete your field reports provides the following benefits:
Client customization of collected data
Ability to capture media files like photos, videos and voice recordings
GPS and signature capture capabilities
Incorporates conditional questions for certain responses to capture greater detail
Choice between all-in-one Daily Report or individual category reports (Weather, Equipment, Incidents, etc.)
Save time by incorporating DocRoute’s workflow functionality and set rules associated with specific fields and responses. For more information on routing rules, see DocRoute™ Overview.
Upon submission, eForm report files are indexed in Sage Intacct Paperless
Important
You need to import the Sage Intacct Field Report document types to ensure that submitted eForms™ are synced and indexed properly. To do so, log in to Sage Intacct Paperless, then select . Click the button.
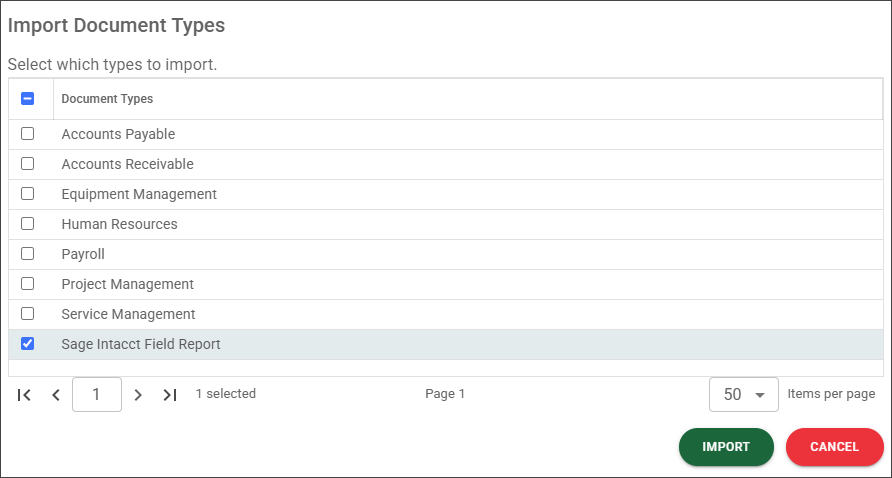 |
From there, select the check box in the list. Multiple options may display if there is an active bridge to that respective accounting system. Click .
Multiple document types (for example, daily report, equipment report, meeting report) are imported into the system. For more details on importing document types, see Import Document Types.
Log in to the eForms™ Administration Portal.
Select .
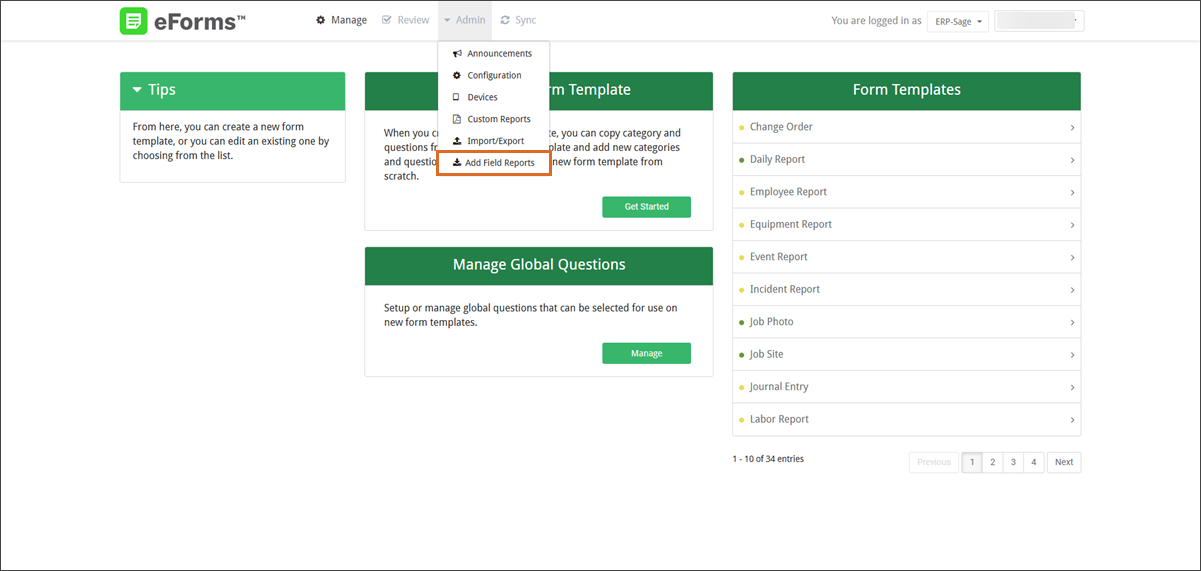
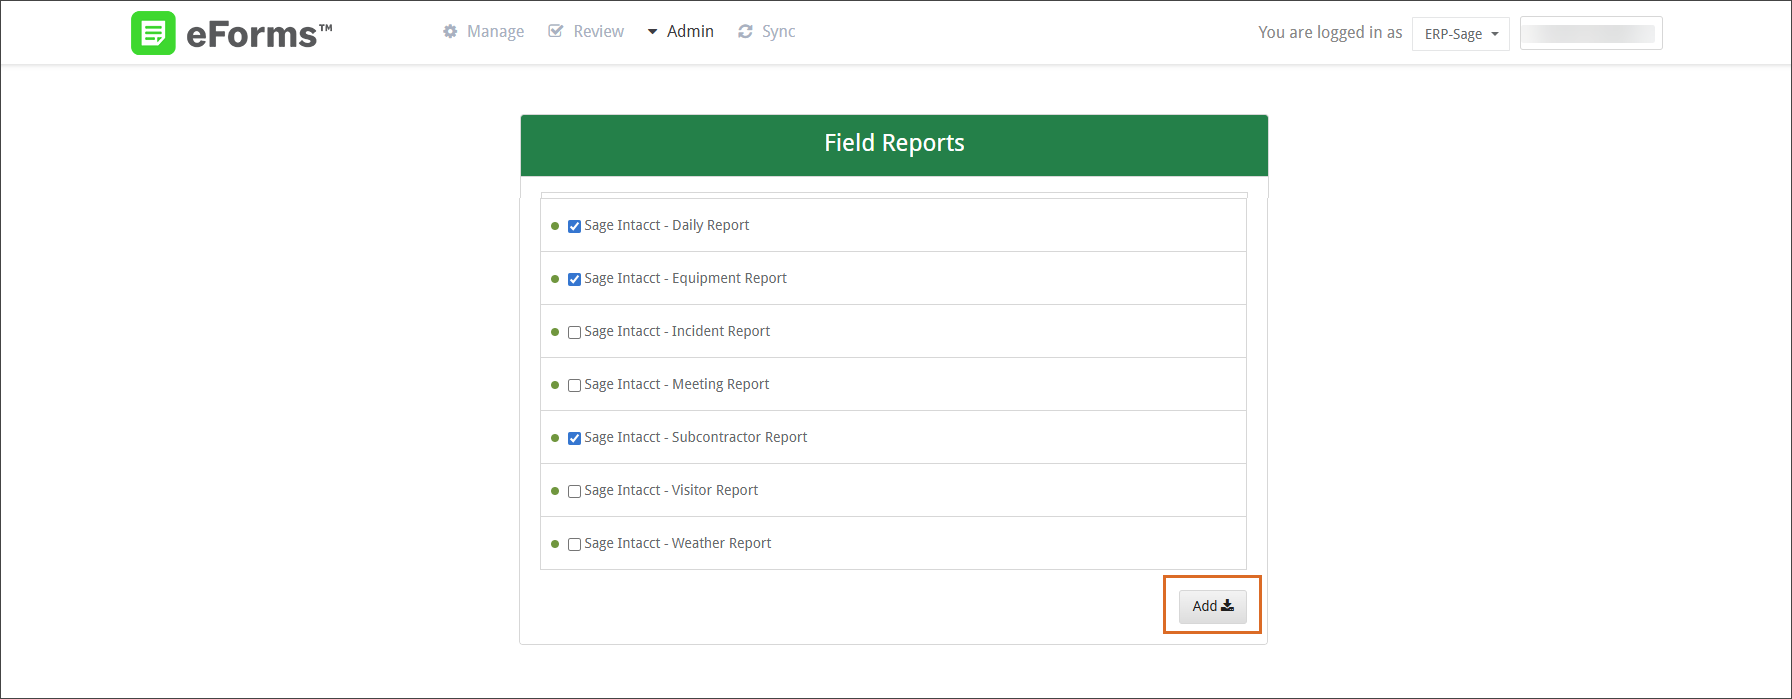
The Field Reports page displays and lists all reports available for your accounting system.
Note
The Daily Report contains all available field reports, while the options beneath represent its individual categories. You can choose to use the entire Daily Report eForm or one or more individual field report options if that is a better fit for your company’s reporting needs.
Select the check box for the report(s) you want to configure.
Note
For a list of all daily field reports available in Sage Intacct Paperless, see Sage Intacct Paperless Field Reports.
At the bottom of the page, click .
You are returned to the eForms Administration Portal home screen, and the form(s) you selected populate in the Form Templates grid.
Note
Forms with an inactive status display a yellow indicator and forms with an active status display a green indicator.
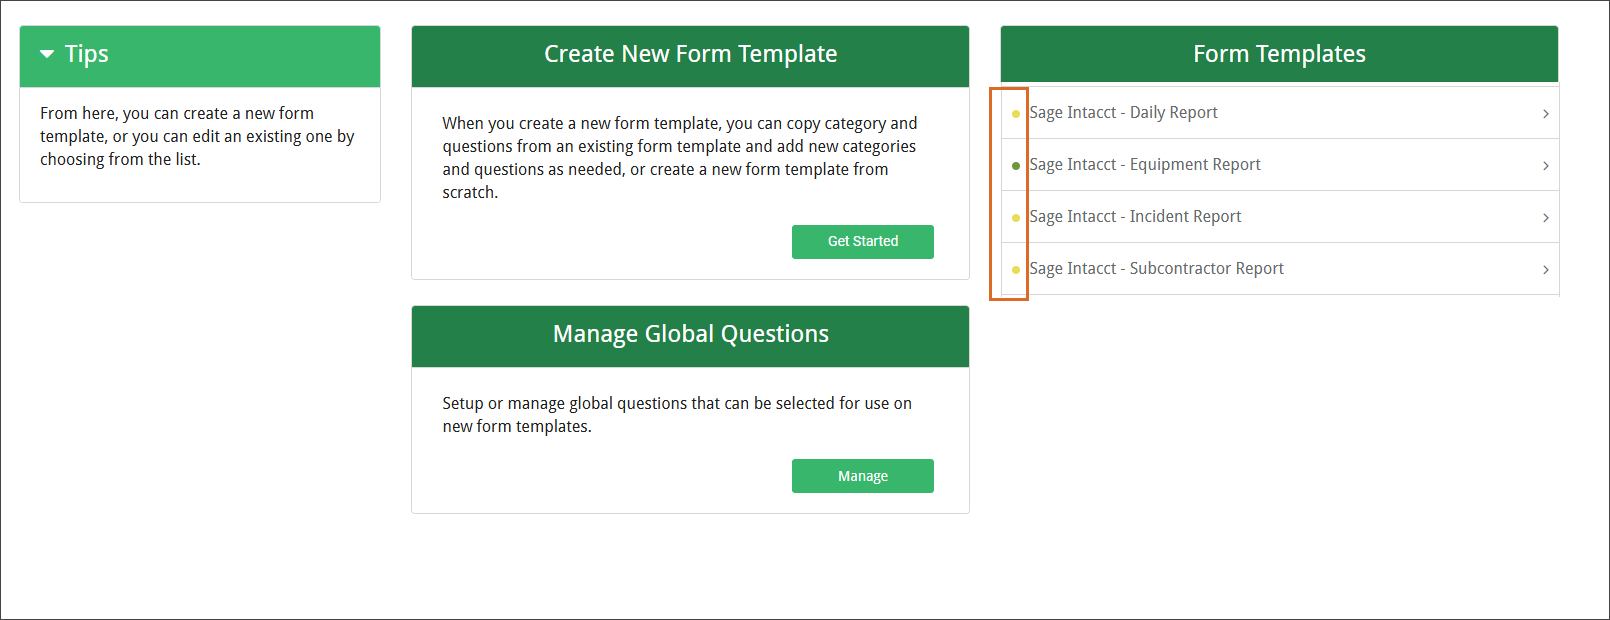
Click on the form to open it.
Note
The form is set to an Inactive status.
Click the Edit
icon.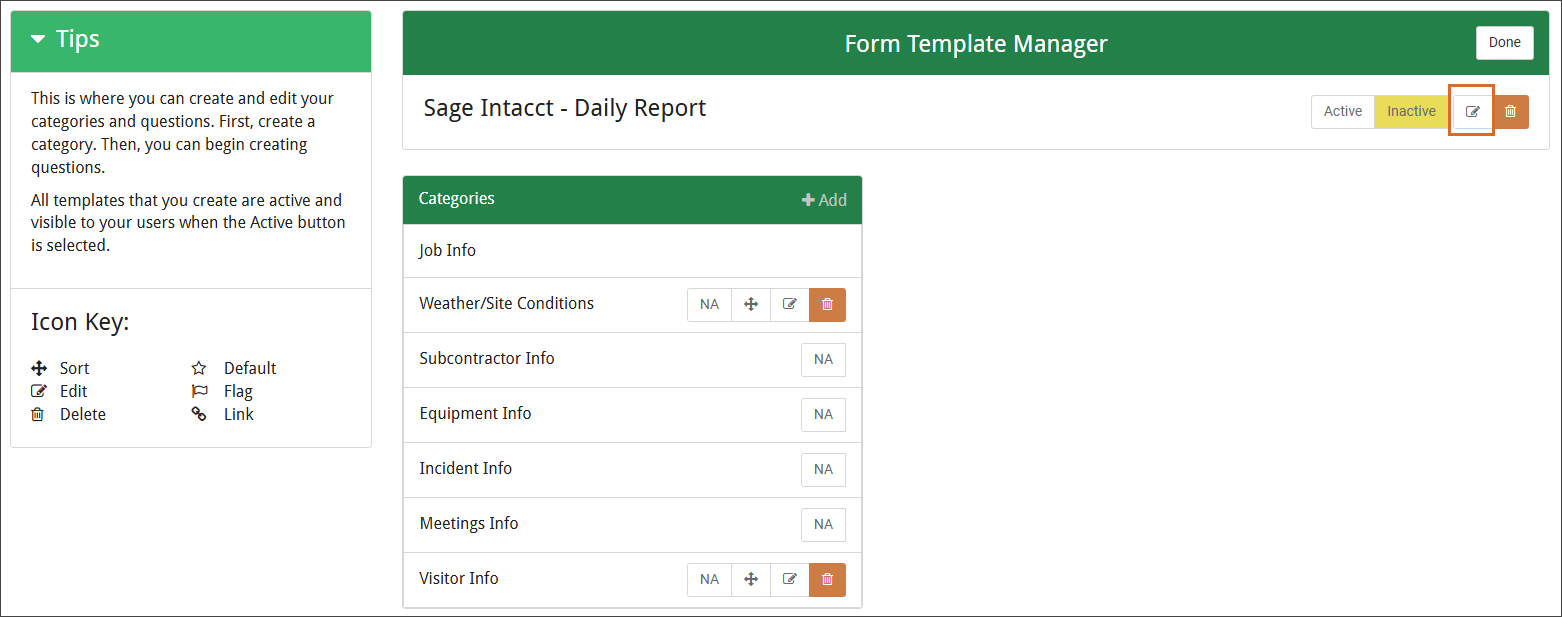
The Edit Template page displays:
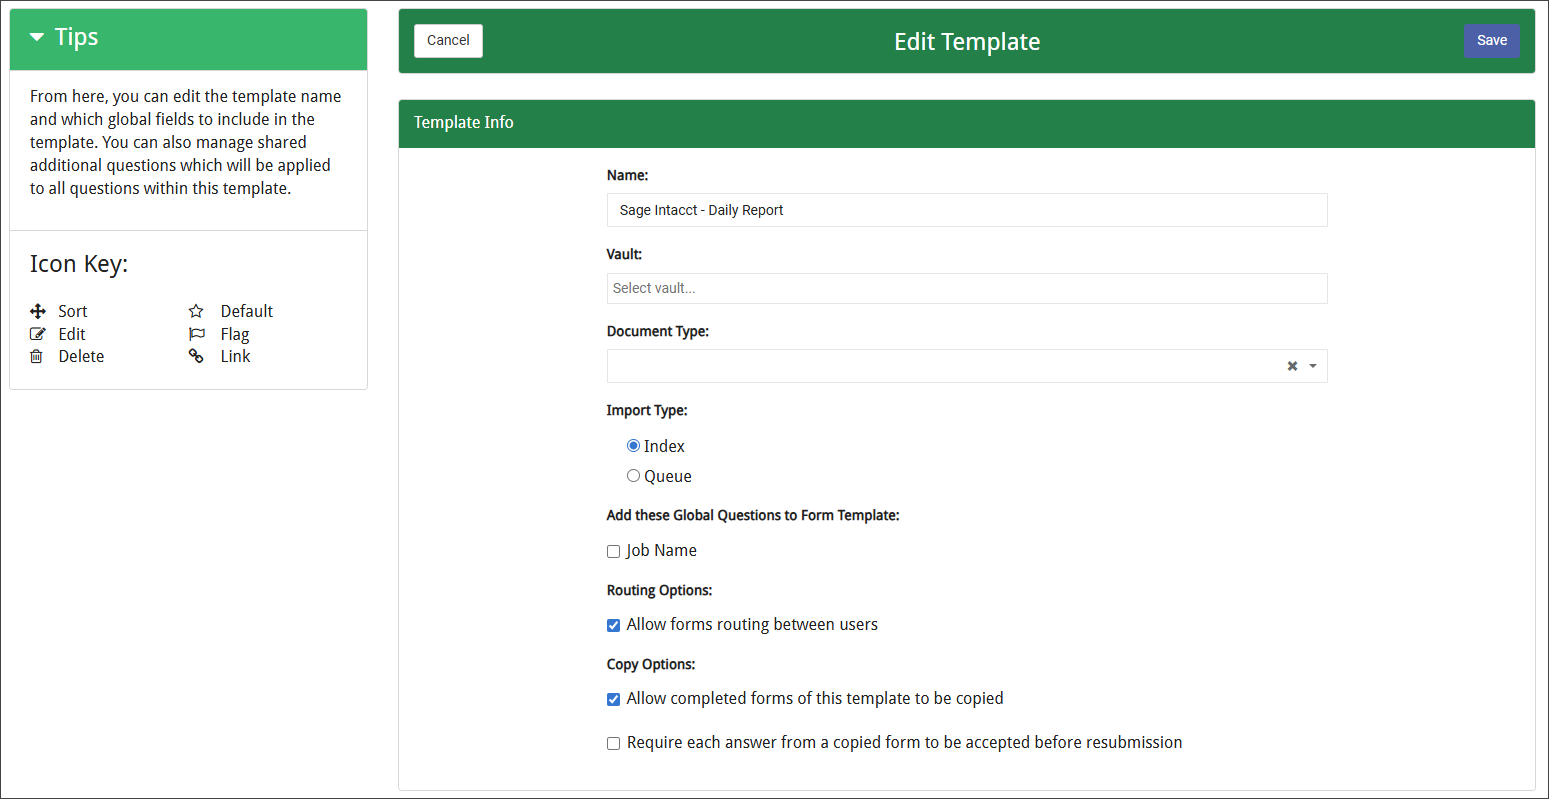
Complete the following Template Info fields:
Name: Keep the assigned template name or enter a new name to make it easier to track.
Vault: Select the appropriate vault (or vaults) from the list.
Document Type: Use the dropdown to select the document type that matches the form you selected.
Import Type: Select either the or radio button, depending on how you want the reports directed once they sync with the ERP.
Add these Global Questions to Form Template: Select the check box if you have previously created a Global Question and you want it to be included in this template.
Routing Options: Select the check box to allow the form to be routed to different users for signature, approval or further action.
Copy Options: Select the check box if complete forms can be copied. For example, to be copied and used as a starting point the next day.
Click .
The Form Template Manager page redisplays.
Note
By default, field report categories are marked as NA, or not applicable, on the Form Template Manager page and in the eForms application. The NA setting enables users to skip the categories and questions that do not apply to them. For relevant categories, users can click the button to enter information.
Click a Category from the list to display its list of questions.
Important
Because this is a pre-built form, the response types, behaviors and editing options vary for each question. Some questions can be edited and some are read-only.
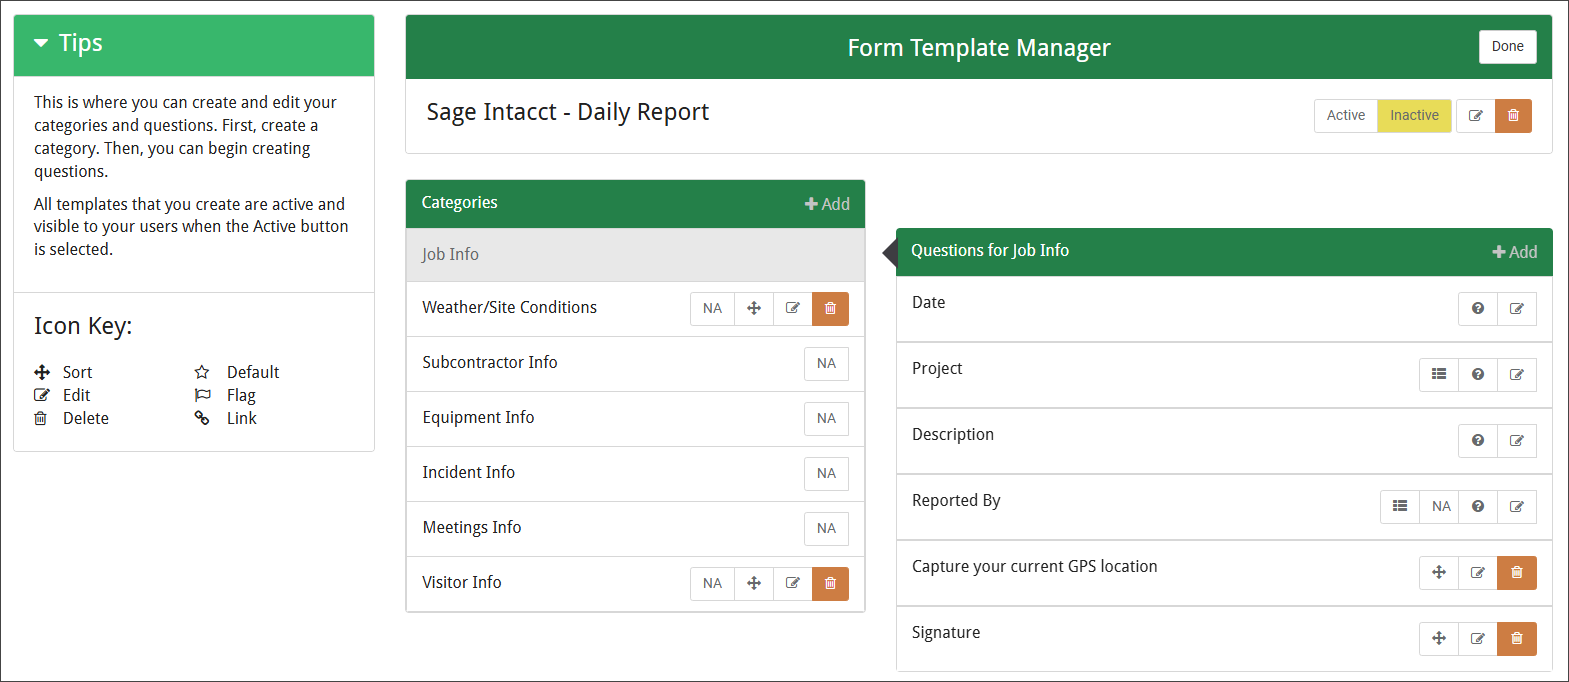
Review the list of questions for each category.
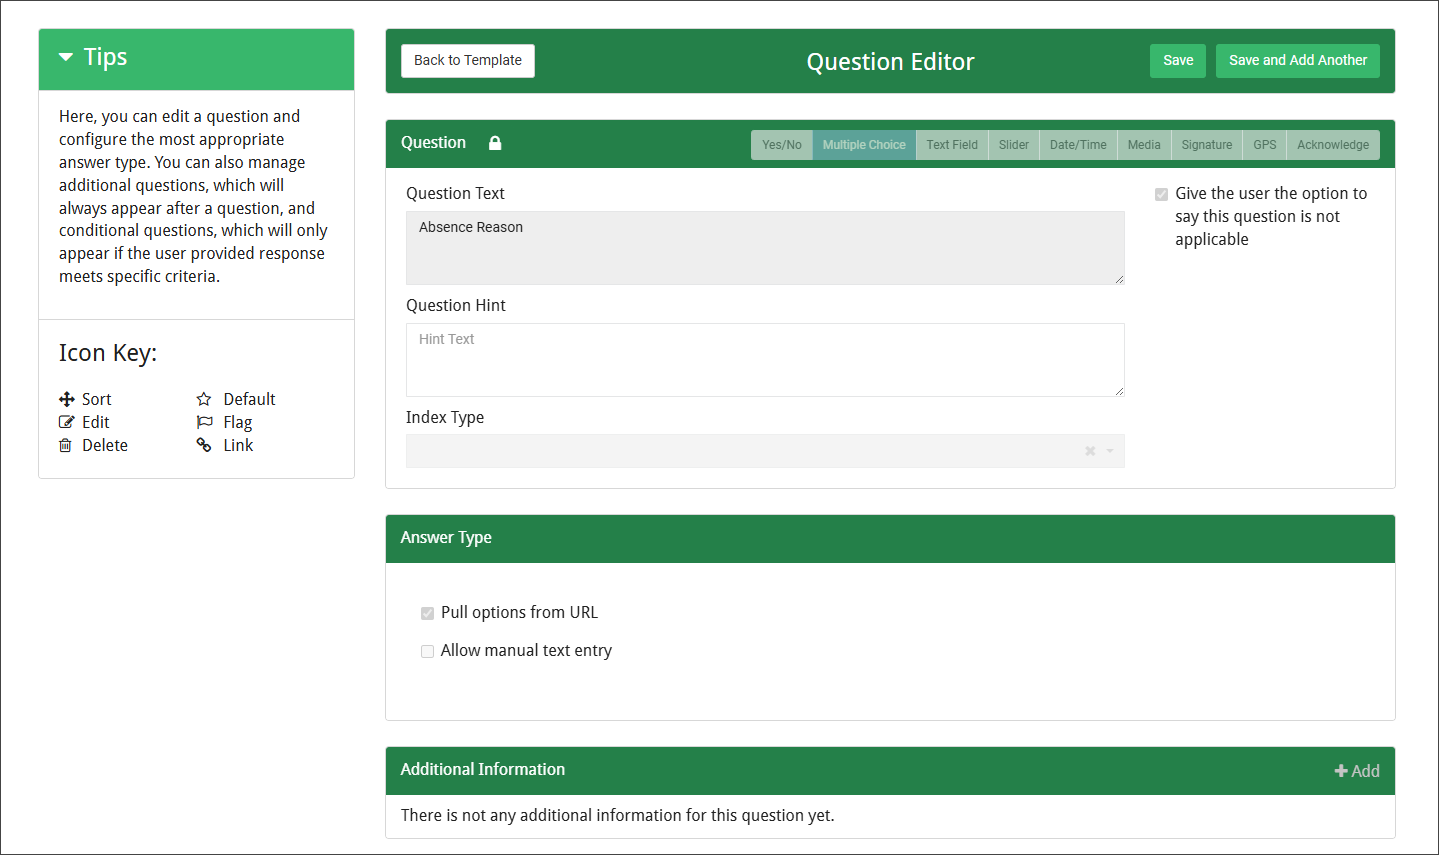
If you find a question you want to review or customize, click the Edit
icon.The Question Editor page displays:
Note
Refer to the Icon Key section at left to understand the changes you can make to the question. Options that are grayed out cannot be edited, but certain fields allow changes or additions.
(Optional) For some questions, you can add conditional questions based on the user’s response.
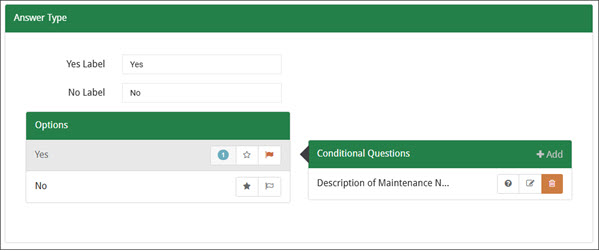
For example, if the user reports that a piece of equipment has damage, you can add conditional questions that require them to add a description and photos of the damage. Click to create a new condition question. Click the Edit icon to open the Edit Conditional Question dialog and make changes.
To save your changes, do one of the following:
Click .
To add a new question, click .
Click when finished.
When you are finished customizing the template, select to make it available to users and then click .
The following reports are available when integrating with a Sage Intacct accounting system:
Daily Report
Equipment Report
Incident Report
Meeting Report
Subcontractor Report
Visitor Report
Weather Report
To complete the Daily Field Report, begin by downloading the eForms™ app to your Apple or Android device. See Download and Use the eForms™ App for more information.
Sign in to the eForms™ application.
Find the appropriate form from the Start a New Form list or from Your Forms if you already have one in progress.
Proceed through the questions and enter the requested information.
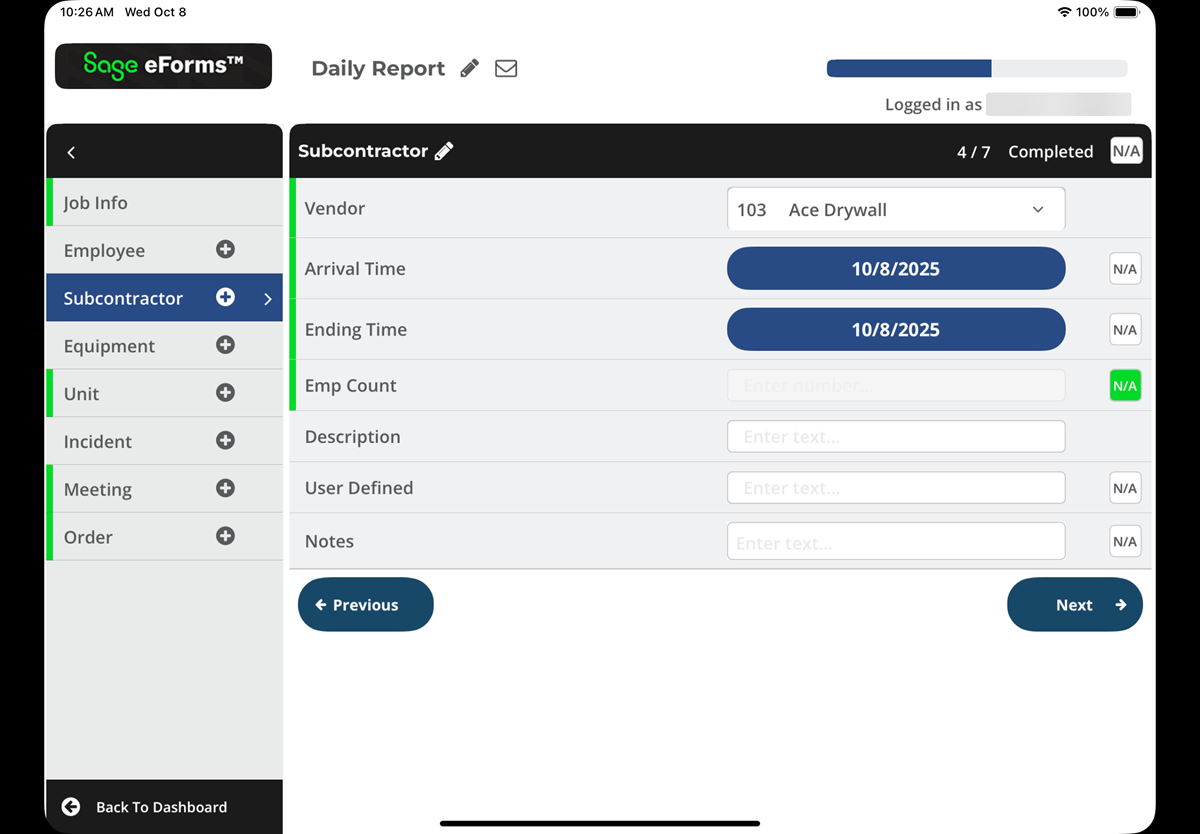
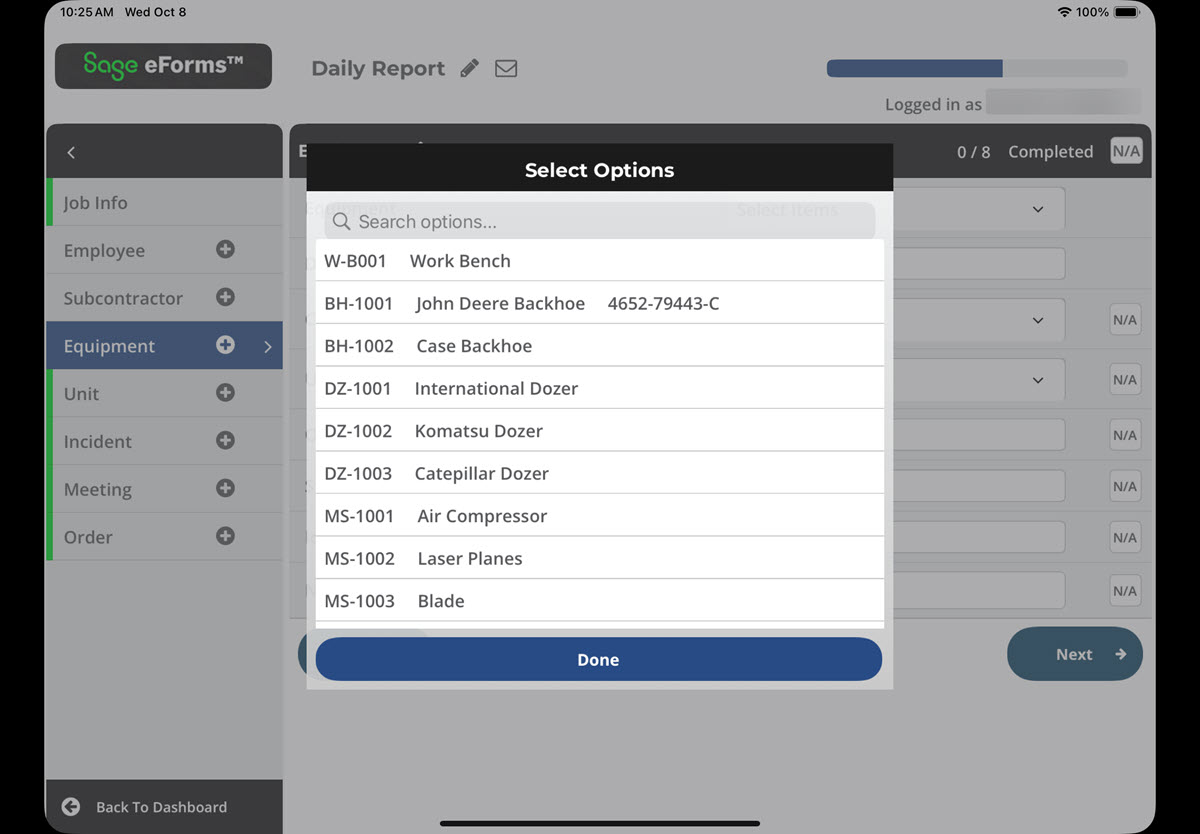
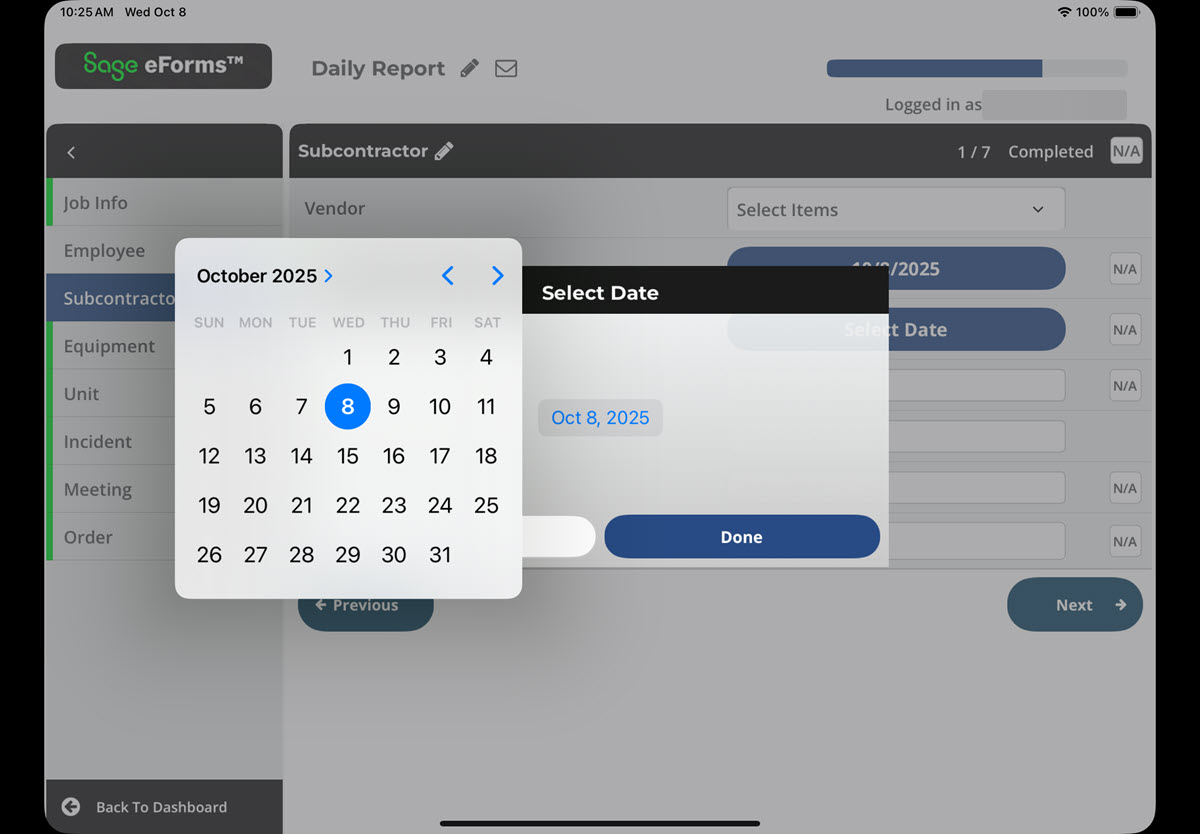
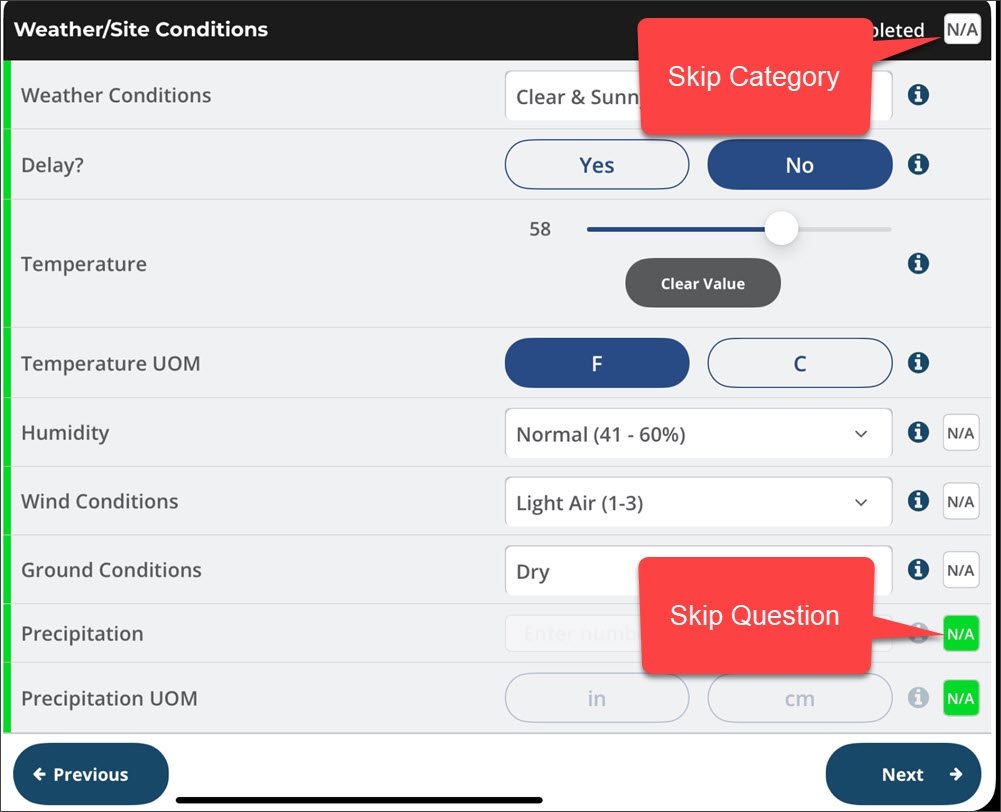
Some questions require information to be chosen from a list, typed into a field, or entered using a slider, calendar or time selector. You can even upload photos, add a signature or capture your current GPS location. See the examples below:
(Optional) Use the button to skip categories or questions if they do not apply.
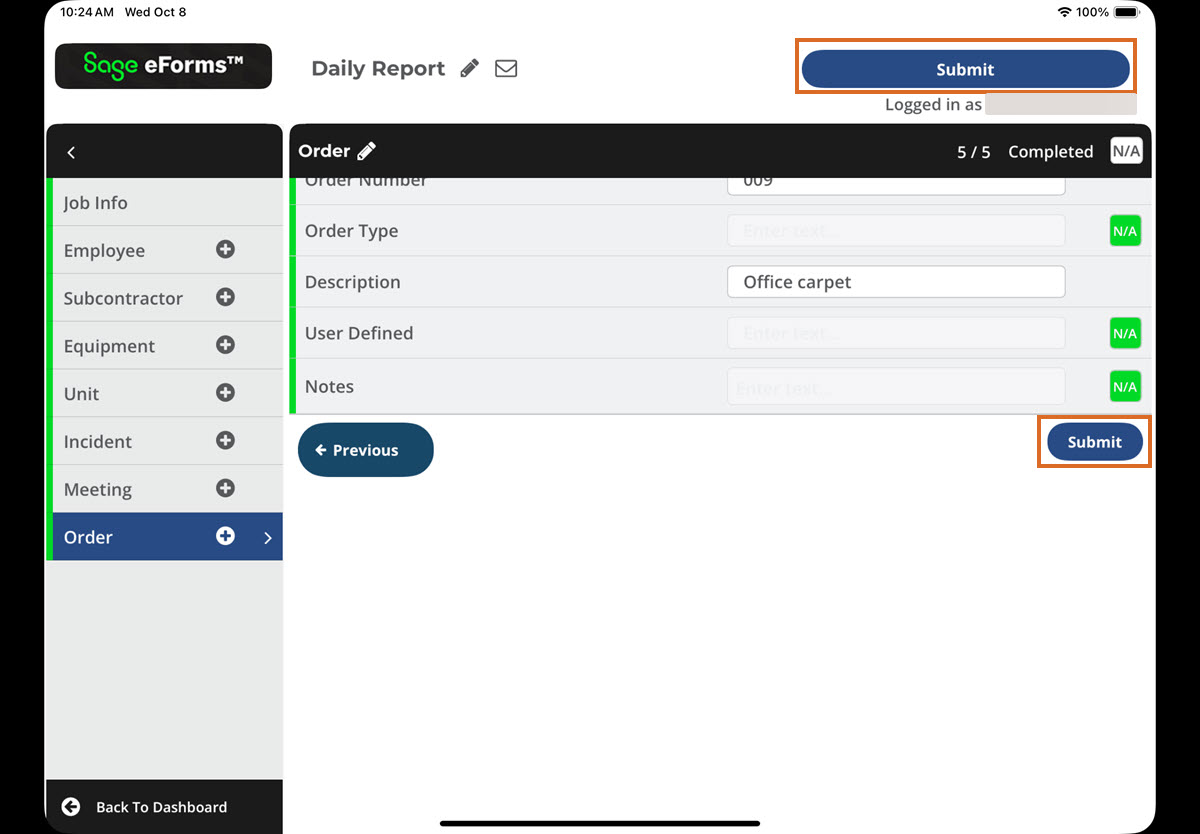
After you have completed the form, click .
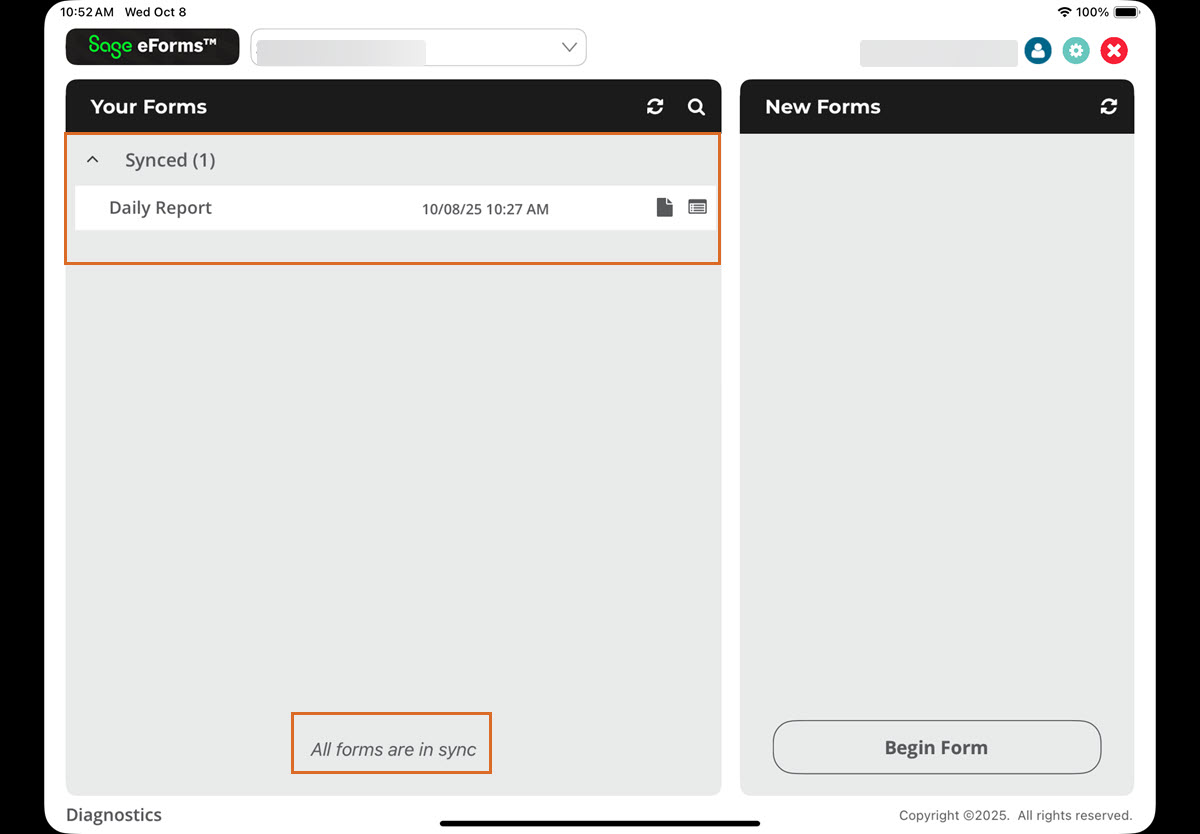
If the device has access to the internet or cellular data, the field report syncs with Sage Intacct Paperless. If not, the report syncs once access is restored.
Note
The last page of the report file displays full-sized versions of the uploaded images included in the field report.
If you encounter a routing error, an icon similar to the following displays:

Click the red circle icon to view a tool tip indicating that the routed form contains sync errors.
Open the form and look for the visual indicators identifying where errors exist.
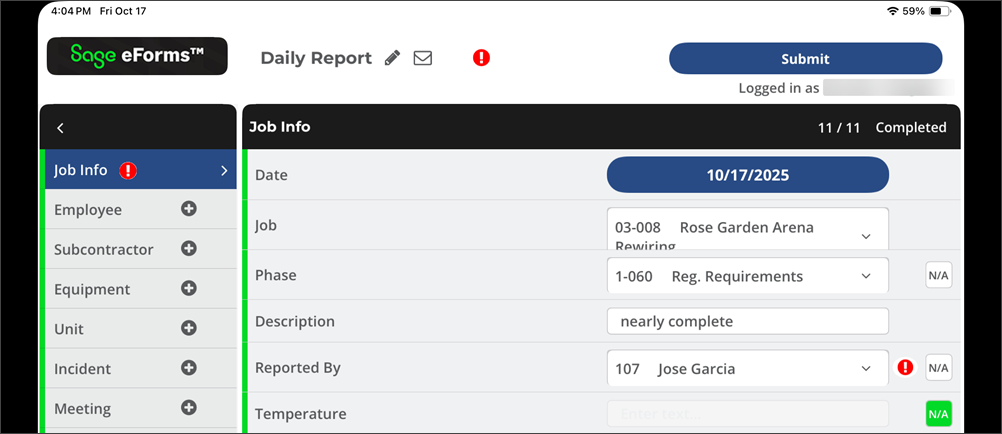
When you click the error on the question, the specific error message displays.
Correct the error(s) and then re-route the form as appropriate.